
So, you have filmed a couple of videos. Perhaps for your YouTube channel or online course. Or you filmed a music video. Maybe you filmed a special event or moment in parts and want to combine them into one whole video.
There are different reasons why someone might need to add videos together, and there are apps that can help you do exactly that.
From Keevi Video Editor to iMovie and Windows Photos, we will talk about the best five tools across different platforms to accomplish this.
There is also a detailed step-by-step guide on using each one and tips for adding videos together for the best outcomes. When you reach the end of this blog, you will be able to merge all kinds of videos to create engaging content.
Top Five Apps to Combine Videos
Without having to spend a ton of money on expensive software or paying a professional editor, you can add videos together and achieve semi-professional to professional results.
And while a cursory search on Google or your app store would turn up many options, not all of them are ideal for your project. Many have limited editing capabilities. Some come with watermarks that require payment to remove.
If you are looking to spend little to zero amount of money and get maximum value, these five apps are great options to explore.
Web-based Apps
- Keevi Video Editor
- Adobe Spark
Mobile Apps
- Inshot
- iMovie
Desktop Apps
- Windows Photos
Keevi Video Editor

If you want to add videos together, it is better to use a computer app because they generally offer better features and faster processing speeds. In this regard, we recommend Keevi Video Editor.
It is free and easy to use with rich features, including support for merging different video files. It's not just videos either. You can also join videos and pictures with the app.
Right from the upload process, it stands out as an intuitive app. While most apps allow uploads from local storage, Keevi also lets you upload videos from the internet. It could be from YouTube, blogs, or podcast directories.
You don’t necessarily need the link to these videos either. The app has an AI that you can use to search for content online to merge with your creation. YouTubers who make reaction videos will especially find it handy.
Suppose you are uploading files from your local drive. In that case, Keevi Video Editor supports a vast number of video formats, including AVI, FLV, MP4, MOV, WebM, etc.
Once you have the videos, stitching them together is just as easy. You can split and remove the unnecessary parts, add filters, emojis, and gifs. There is also an option to add audio files as a voiceover for your new video or override the original audio content.
Keevi video editor has other slate of features that include -
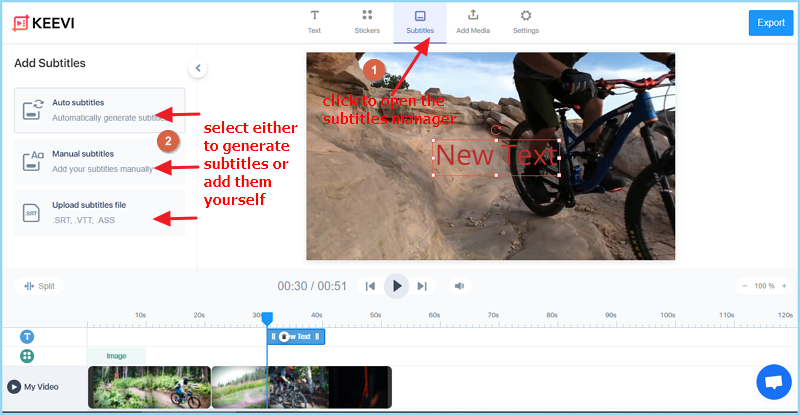
- Auto subtitle generation
- Subtitle upload
- Contextual text
- High-definition video support
- Aspect ratios with social media formats
- Live chat for technical support
After you finish combining your videos and applying the necessary edits, you can export them in your preferred resolution.
Keevi Video Editor also lets you publish your new creation directly to Twitter, Facebook, LinkedIn, and other platforms. And it is all free to use.
How to Use Keevi Video Editor app to Combine Videos into One
With Keevi Video Editor, you don’t have to download anything. Once you are ready to merge your videos, simply click this link.

Once the page opens, you are now ready to merge your videos and create your next video.
STEP 1: Upload your videos

As you can see, you can also add stock videos, record your screen, or import videos directly from YouTube.
When you click the “Browse” button, a pop-up window will open. Next, find the folder with the videos you want to combine.

After uploading the first video, click the “Add Media” tab to upload other videos. You can also upload a picture here.


Repeat this process for each video or picture.
Step 2: Edit and Merge your Videos
With Keevi, it doesn’t take long to upload videos. However, how long would it take depends on your video’s size and your computer’s processing speed.
After the videos finish uploading, start merging and editing them into the final look.

Asides from editing the placement, you can also
- Minimize and enlarge the image
- Use the rotation bar to change the image’s orientation
To see how long the image stays on screen, expand and contract the image bar to your preferred time. If you draw the bar over the video’s time, the picture and video will overlap.

Editing actions you can perform on the video include rotation, increasing or decreasing the audio volume, and set the video transformation.
Additionally, using the timeline, you can crop out parts of the video and overlay them on other videos or images.
STEP 3: Trim and Cut Unnecessary Parts
Do not forget. You are not just merging videos into one. You are trying to create one beautiful narratively cohesive video.
To do this, use the Keevi Video Editor to split each video and remove parts you don’t need, as shown in the video below.

Once you have removed every unwanted part, now merge the videos by arranging the order of their appearance in the timeline.
You can either use transitions to bridge scenes or simply blend every video with the other by erasing gaps between them. You can perform both actions in one video.
Step 4: Customize your Video
Now that you have combined your videos, you can use personalization tools to customize different parts of the video.
You can add text -


You can also add GIFs and Emojis -

Add subtitles -
You can also set the aspect ratio (output format) with settings, change the background color, and set the output quality.

Step 5: Export your Video
You can always preview your video by hitting the play button on the main section of the app. Once you are satisfied with the look of your newly merged video, export your video.

If you prefer not to download the merged video, you can publish it on any social network of choice. You can post it directly on Twitter, YouTube, LinkedIn, Facebook, and others.
Adobe Spark

Adobe Spark is another great tool to combine your videos. Millions of people use it, and there is robust customer support if you need help. It is not completely free, however.
Adobe Spark has an intuitive interface, so you don’t have to be a professional to use it. As one would expect, it comes with a range of features that make it easy to combine videos and create a beautiful video.
It has pre-made themes, transition effects, font styles and more. Additional features -
- Universal sharing
- Online upload
- Video branding
Aside from its technical features, you can also check out trending videos for inspiration on Adobe Spark. What’s more, you can invite others to edit the video along with you.
Its mobile app is only available on iOS, and you can’t upload multiple videos at once on the web version. Besides that, it is a great option to combine videos on mobile and the web.
Using Adobe Spark to stitch videos together
To use Adobe Spark to combine two or more videos, download the app if you have an iOS device, or go to the web version by clicking here.
Once it opens, follow these steps to add your videos together.
STEP 1: Start from Scratch
After it opens, you can either start from scratch or pick any of the professional story templates.

STEP 2: Click Video to upload the first video file

STEP 3: Determine the parts you want to upload
Unlike others, Adobe Spark does not just upload every part of the video automatically. Before importing, you can trim and cut unnecessary parts of the video.
Draw the slider to both ends of the timeline if you want to upload the entire video.

When you finish, go to the top right corner and hit Save.
STEP 4: Click the New Slide button to upload more videos
To add the second video, click the New Slide button in the window’s bottom left corner.
Repeat this process each time to add all your videos.

Move the slides from left to right or vice versa to order your videos.
STEP 5: Edit your Videos
Use the available editing tools to customise your video. You can add a credit section and an outro video.

You can also
- Add contextual text
- Add captions
- Add music
- Set a theme
- Resize the video
STEP 6: Download or Share your Merged File
Once you finish editing your file, click download to save your new video on your computer. You can also click share to publish it on social networks, Google Drive, or invite someone else to edit the video.

Before sharing or downloading, you can also check your completed edits via the preview button.
You should also note that the free Adobe Spark comes with a watermark. You will have to pay to remove it if you plan on using it to make a professional video.
InShOt

If you are looking for an app to add videos together on the go, try InshOt. With more than 100 million downloads on Google Play, it is one of the most popular apps in its category, and for multiple reasons.
InshOt is a powerful video editor with high-definition capabilities and several professional features to merge your videos as you envisioned them.
You will be able to split videos into parts, trim and cut out irrelevant parts, add music, rotate and flip the video, choose your preferred aspect ratio, crop your video, and much more.
Beyond merging multiple clips into one, you will also be able to improve the look of your final video with features like -
- Over 60 Transition effects
- Music Upload
- Recorder
- Contextual Text Editing
Even though you are editing on your mobile device, you can export your merged videos in high definition quality. You can export 1080p or 4K videos with the app, which you can share on every social app.
Additionally, the video merger app comes with a Photo Editor & Collage Maker. And it is regularly updated.
How to Use InShOt to Combine Videos on Android
Aside from having many useful features, InShOt is also popular because it is easy to use. To take advantage of everything the app has to offer, download it either from Apple Store or Google Play.
Once you have done that, simply follow these steps to add your videos together.
STEP 1: Open the app and click on Video

STEP 2: Go to the library and select the videos you want to combine
Take note that the videos will appear on the editor timeline in the order you selected them.

You can navigate to find the relevant folder by clicking the arrow button at the foot of the page.
STEP 3: Trim and Cut out unnecessary parts by clicking each clip twice.

When the handlebars appear, simply slide them to the left or right to trim the video.
STEP 4: Get creative by applying transitions, texts, and stickers

STEP 5: Save your final video by tapping the button on the top right corner

After you click the Save button, you will be able to select the video quality you want.
iMovie

If you prefer native apps or something completely free, try Apple’s iMovie. It is a mobile app available on iPhones and iPads. It also has a desktop version you can use on your Mac device.
Although mobile video editors generally lack the rich tools you would find on web-based apps like Keevi, iMovie is an excellent mobile alternative.
With it, you can do basic things like trim, split, and cut your videos. You can also speed up or slow down individual clips to add dramatic effects to your merged video.
The standout quality that makes iMovie one of the best apps for combining videos is its array of creative tools. It comes with eight unique themes to give you a head start. It also has 11 animated title styles and 13 Apple-designed video filters.
Other creative features include -
- Over 80 soundtracks
- Sound effects, Narration, and Music library
- Picture in Picture and Split Screen effects
- Green Screen effects
When you finish adding your videos together, you can export the finished product in different stand video resolutions, up to 4K. Also, your new video is sharable directly to YouTube, Instagram or friends and family via mail and messages.
How to Use the iMovie app to put two videos together
Combine multiple videos with your iMovie app by following these steps -
STEP 1: Open the App and select Create a New Project
You will see two options: Movie and Trailer. Click on Movie.

STEP 2: Open your gallery by clicking on the Media button in the top left corner
Make sure you select the videos in the order you want them to appear in the timeline. When you finish, tap Create Movie.

STEP 3: Use the tools to edit your videos

Here, you can use the filters to make sure your clips look the same. You can also use the transition effects to choose how your clips merge with the next.
STEP 4: Hit Done when Your Video is ready

Windows Photos

Windows Desktop users who have upgraded to Windows 10 can also use the Windows Photos app to add videos together. It is the modern replacement for older apps like Windows Movie Maker, Windows Photo Gallery, and Windows Photo Viewer.
The app contains an image organiser, graphics editor, and video editor. The latter is a free-ish app that you can use to stitch different clips together. It is free-ish because access to some features require purchases.
Still, most tools you need to merge your videos are available for free. With Windows Photos’ video editor, you will be able to trim, split, and cut videos. There is also a storyboard where you can edit each clip before merging.
Other features include:
- Speed adjustment
- Contextual texts
- 3D Effects
- Motion Effects
One noteworthy downside of the Photos’ app is the lack of transition effects. However, you can try two workarounds. You can download transition effects, then insert them in the storyboard and merge it with your videos.
Another option is trimming your clips so that each clip begins where the former ends. You will have to take note of this during filming before you merge them. Other than that, Windows Photos is a solid app to put multiple videos together.
How to Use Windows Photos to Combine Videos into One
Using Photos’ video editor is pretty straightforward, not just for adding videos together but for combining pictures and videos too. It links to your OneDrive so you can import videos and photos from cloud storage.
Once you have identified the location of the clips, take these steps to merge your videos:
STEP 1: Launch the App
Type ‘video editor into your Search bar to launch the app

STEP 2: Create your Video
Select ‘New Video Project’ from the window to get started. Name your video to keep track of your current projects.

STEP 3: Select and insert your video clips
Import videos into the storyboard by opening the Project Library window and select clips from the relevant folder. Here, you can add videos from your computer, past videos from your Photos collection, and the internet.

STEP 4: Edit the videos
Once your videos are on the storyboard, you can now begin to edit them using the various tools available in the app.

You will be able to -
- Add title cards and text to inside scenes
- Remove black bars and adjust dimensions
- Trim, split and cut parts of the video
- Add background music or upload your own
- Pick a theme
- Add 3D effects, filters, and adjust speed
STEP 5: Save
When you are satisfied with your merged video’s new look, click on Finish Video, choose your preferred video quality, and select export.

That’s it! You now have a merged video.
Again, it is worth reiterating that Windows Photo’s video editor is functionally limited. If you want something with a lot more editing features, try Keevi.
What to look for in a Video Merger App
What should you look for while shopping for a video merger app? Here are some qualities you should look out for when searching for the best app to combine videos.
- File type compatibility
Video files are stored in different formats. Common video file formats include MP4, MPEG, AVI, FLV, WebM, MOV, and 3GB and most video merger apps support them. However, do not assume and check the format of your videos to ensure that the app you intend to use supports them .
Conversely, check the supported export file format. While most apps or web-based tools like Keevi can export files in the same format they imported them, there are exceptions.
The best apps can import and export a wide range of file formats. That way, you can maintain or improve the quality of your merged video.
- Maximum Video Length
Are you trying to combine two or three videos? Five or ten? What is their combined length? How many minutes do you need after trimming and cutting? These are essential details to consider before you choose an app to combine video clips.
You need to do this because not every app is the same. Some have a limit on how long your merged video can be. This is especially true for free video joiner apps. To combine longer clips into one, you may have to pay.
However, there are exceptions like Keevi that allow you to combine and export videos of any length. You can combine short clips for travel vlogs or edit a feature-length film.
- Additional editing features

Any app to put multiple videos together worth its salt has at least the ability to trim, cut, and split clips. While this might be enough for a short, amateur or semi-professional video, it is not if you are aiming for something professional.
For that, you need to pay attention to the extra editing features. These are usually the creative tools that let you customise the video. They include contextual text, background music, sound effects, and transitions, etc.
You can even consider more technical features like themes, green-screen effects and picture-in-picture. The more features a video merging app has, the better it is.
- Supported aspect ratios
There are different platforms, especially social media, where you might want to publish your merged video. Media files are displayed differently. It could be vertical, horizontal, or square. This difference in size between the width and height of a file is called the aspect ratio.
Before you start merging, it is better to ensure the app can create videos in the destination platform’s aspect ratio. Editing in the right dimension is a best practice to ensure your video is professional and well-suited to your audience.
Best Practices when Using Video Joiner Apps
As stated earlier, you don’t have to be a professional video editor to use video joiner apps. All you have to do is pay attention to these tips, and your video will come out looking great.
- Use a storyboard

Think of it as a roadmap for your final video. Creating a storyboard allows you to visualise your video before you start editing. You will be able to compare each choice and determine the right editing features fit for each scene, clip or the whole video.
To do this, you can either go old school and sketch out each frame yourself. However, there are digital storyboards you can use to craft out your future video. Also, some video merger apps come with a storyboard, which can help streamline your workflow.
- Organise your raw files in one location

The process of merging and editing a video can be long and stressful. One way to simplify the job is to create a storyboard and organise all the relevant individual files in a central location. It will make it easy for you to find and import your clips without additional effort in searching for them.
An essential aspect of achieving this to make sure you save every file in the appropriate name. If you are filming with your phone, try and rename each file after every break in recording. You can perform the same action with a camera or rename the default saved file title to your project’s name before you begin filming.
- Use music and sound effects

Do not forget your audience are humans - emotional creatures. They are more likely to respond to videos that trigger their emotions. Apps like Keevi and Windows Video Editor have a library of background music and sound effects to enhance your video’s emotional impact.
You can also upload your music if you want something outside an app’s library.
However, look out for volume control. Keep a good balance between your music and the visual content of your video. Too loud, and you risk distracting from the video’s message or turning off your audience entirely. Too low, and it will have zero effect.
- Use transition effects to maintain story flow

There is a strong likelihood that your clips are random parts of a larger narrative. To achieve cohesive storytelling, use transitions to bridge different clips. They blend clips and serve as visual cues for the audience when you move into other parts of the story.
All the good apps offer a range of transition effects you can apply to your videos. If an app does not have the transition effect you want, try downloading it as a video file. Then, insert and merge with your clips.
However, use transitions in moderation. If you use too many, it will distract from the point of your video.
- Apply contextual text when necessary

If you are not publishing your video online or sending it to an outsider, you may not need to add contextual text. However, it is vital to use contextual texts if you are publishing online, a YouTube video, Instagram or LinkedIn post.
It is a necessary tool when the story or message of a scene or moment is not self-evident to the audience. However, try not to overuse it. Like transition effects and background music, too much can be a distraction and dampen the point of your content.
FAQ
How to combine videos for YouTube?
Whether you self-recorded or downloaded clips online, you can combine videos for YouTube with Keevi. Additionally, you can either save to your PC or publish your final video to YouTube directly. You can also use any of the apps we suggested above to combine videos for YouTube.
All you have to do is ensure you export the final video in a YouTube-compatible format.
What video format should I export to?
It depends entirely on where you want to publish the video. Every platform has its own acceptable format. Check the destination platform’s requirements to know the correct format. But if you cannot find a specific video format requirement, you can always use the MP4 format.
What is the fastest way to export videos?
Keevi Video Editor is an easy-to-use editing tool for creating and exporting videos without downloading and learning software. It has several editing features to customise your video, with a large stock of templates that help you merge your clips professionally and in record time.
Conclusion
Filming often happens in breaks, and combining video clips is a great way to ensure cohesive storytelling in one video. There are many apps capable of helping with this. However, when it comes to apps to add videos together, we recommend Keevi. It is free, has a long list of useful editing features, and allows direct social media publishing.
.jpg)

