%20(1).png)

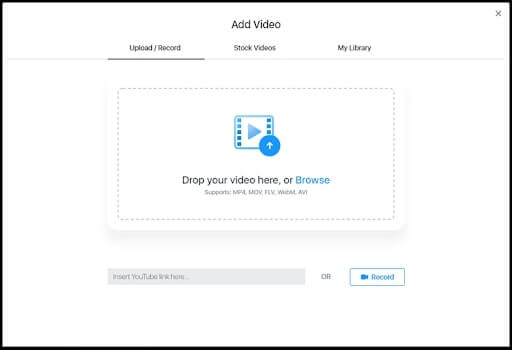
Insert the link to the YouTube video you want to cut in the URL bar. The editor will automatically import your video. You can also upload the video using the “Browse” option if it is already on your computer.
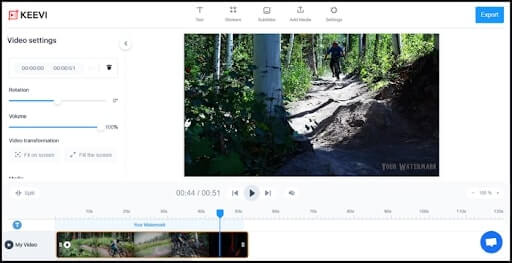
Place the blue marker at the start time in the section you want to cut. Select ‘Split.’ Then place the marker at the end time and click split again. Finally, click the trash button to delete the unwanted section.
.jpg)
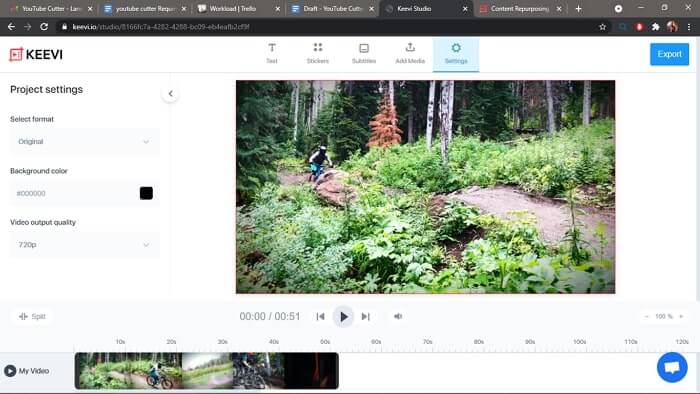
Click the export button at the top right corner of the editor to render the edited video. When rendering is complete, share it on different social media platforms or download the new video to your computer.
Keevi YouTube Cutter lets you reshape YouTube videos into your preferred look by cutting or trimming. Use advanced tools to merge multiple videos and share them online without breaking a sweat.
Cut and Merge Multiple Videos
Remove unnecessary sections from more than one video at the same time. Combine leftover parts from each to make one video.
No Watermark
Completely free. Just launch the editor and start editing.
Crop and Resize Video
Set the aspect ratio to fit various social media formats. Reshape one video for all your communication channels.
Publish to YouTube
Share your edited video directly to YouTube without downloading. Also Facebook, Twitter, LinkedIn, and more.
Keevi YouTube Cutter is entirely browser-based. There is no need to download an app or software on your device. Just open the website, and you will be cutting your next video in no time.
Prior video editing knowledge is unnecessary with Keevi YouTube Cutter. It is easy to use with clearly defined functions to help you craft your next viral video.
You never have to worry about the file format. Keevi YouTube Cutter can cut any video in all major file formats, including AVI, MKV, FLV, MP4, MOV, etc.
Keevi edited videos are free of the watermark. But you can add one to your edited video to personalize and ensure your work gets the proper credit it deserves.

Use Keevi YouTube Cutter to improve the quality of the cut video by adding music or sounds. You can add audio files from your local device or use the editor’s extensive library of stock files.
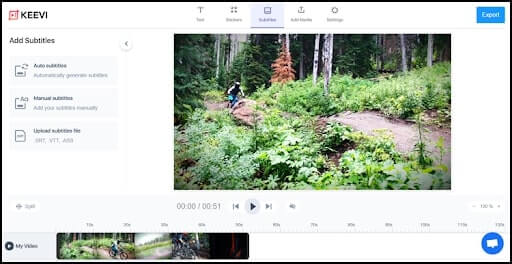
Keevi’s advanced artificial intelligence automatically generates subtitles. Generated one already? Upload to the editor. You can also manually add them, all inside the editor.
-min.gif)
Personalize your videos by adding images, GIFs, and stickers to the cut YouTube video, all without ever leaving the editor.
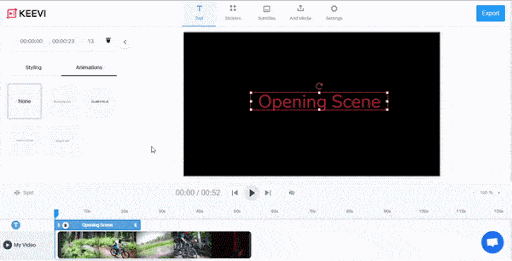
Want to add some style and contextual information with text? Use the editor to add words to scenes. Also, choose the font, color, size, and format that best suits your brand.
-min.gif)
Track your progress with Keevi Youtube Cutter real-time preview. Listen to added audio files and make necessary corrections before publishing the perfect-looking video directly to social channels.

A YouTube Cutter is a smart tool that helps you cut and edit YouTube videos. Keevi YouTube Cutter is a free video editing tool that is part of Keevi’s slate of content creation products. It allows you to cut out sections and trim the length of a published YouTube video. This makes it easy to create content like highlight reels and reaction videos.
Unlike other such editors, Keevi YouTube Cutter also helps you cut and merge multiple YouTube videos.
Asides from the ability to cut and trim, Keevi YouTube Cutter also lets you personalize the video with various editing features like -
You can also crop and resize videos when you want to repurpose a video for other social channels like Twitter, Facebook, and LinkedIn. When you finish, Keevi lets you publish them directly to these social platforms.
Within certain boundaries of usage, yes, you can trim someone else’s YouTube video. Here are five tips to consider to fairly use another creator’s YouTube video and avoid copyright infringement claims.
1. Keep the copyrighted content short
Although there is no standard definition for ‘short’, you may avoid copyright claims when you cut someone else’s YouTube video if you keep the trimmed content short. Since you plan on trimming the video anyway, shortening a video should not be hard.
Violation of YouTube copyright laws may result in your video removal. And if this happens thrice, YouTube will delete your channel permanently.
2. Comment on the original work
Another way to successfully trim someone else’s video and use it in your video is to comment on the original video. This method has allowed genres of YouTube videos like Reaction and Breakdown videos to thrive on the video-sharing platform.
By infusing your commentary, commenting, or critiquing the original YouTube clip, you transform it into a unique piece of content, which may be acceptable under Fair Use guidelines.
It is worth reiterating that this strategy requires you to pass comment on the part of the original video you are using. Without doing so, any dispute against a copyright claim would most likely result in a loss.
3. Use it out of context
When you use a piece of content outside of the intended meaning of the original creator, such usage may likely fall under fair use.
A popular use of this strategy is using parts of someone else’s video as a meme. In this instance, using this part of the video for humor, different from the creator’s original intention, may protect your video from copyright infringement.
4. Create something new out of the original
Simply modify the trimmed section of someone else’s video into a form that completely changes its meaning.
It could be remixing a piece of music or combining the trimmed video with another trimmed video. Any modification that creates a different version of the original work may generally fall under fair use.
Common examples of this strategy are highlight reels and music mashups. Even a simple addition of clipart to parts of the trimmed video may be enough to protect you from copyright claims and keep your channel from getting deleted.
5. Give proper credit
Ultimately, the safest way to avoid copyright infringement when you download part of a YouTube video for your content is proper attribution. Since creators file copyright claims, most may allow them if you give them proper credit.
Either through contextual text or in the video description (more advisable), carefully cite the name, title, publisher, and link to the original content. As long as the original creator gets the necessary recognition for their work, you may likely avoid getting penalized.
Overall, whenever you can, it is safer and better to use media licensed for free use. YouTube has a vast audio library licensed for public use. You can also ask permission from other YouTube creators before using sections of their content.
You can cut YouTube videos online for free by using Keevi YouTube Cutter. It is a free video editing tool with smart features that lets you remove unwanted sections from a video and trim its length.
The web application is entirely free, has no watermark, and you can cut as many videos as you want.

To get started, simply paste the URL of the video you want to cut in the address bar. Keevi YouTube Cutter will automatically extract and download the video, and you can begin creating your next masterpiece.
You can use Keevi YouTube Cutter to cut down or trim a YouTube video by following these steps:
STEP 1: Automatically Import the YouTube Video
Insert the link to the YouTube video in the address bar. Keevi YouTube Cutter will automatically import and download the video to the editor interface.
Suppose the YouTube video is already on your local device. In that case, you can click “Browse” to upload it from your storage.


STEP 2: Select the parts you want to cut
Once the video is on the video track (or timeline), identify the parts you want to cut out in the timestamp.
A helpful tip here is to use the magnifier icon on the bottom right of the editor to enlarge the timeline. It will give you a better view of each frame.
STEP 3: Split the Video
When you have identified the parts you want to cut in the video, drag the blue marker to the starting position of the unwanted section. Then click the split button in the bottom left corner of the editor, as shown below.
This will separate the start of the clip from the rest of the video.

Repeat the same process for the end position of the unwanted section. It will separate the tail end of the YouTube video from the part you want to cut, leaving it alone in the middle.
STEP 4: Cut the Clip
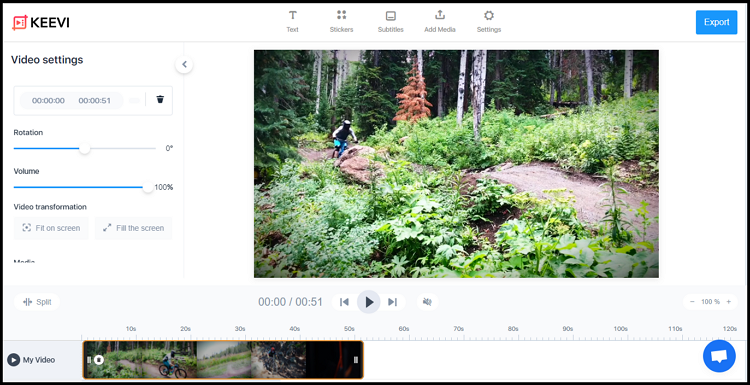
With the unnecessary section separated from the rest, you can now cut it out of the video track and merge the leftover clip.
To do this, select the unwanted clip in the video track and click the trash icon.

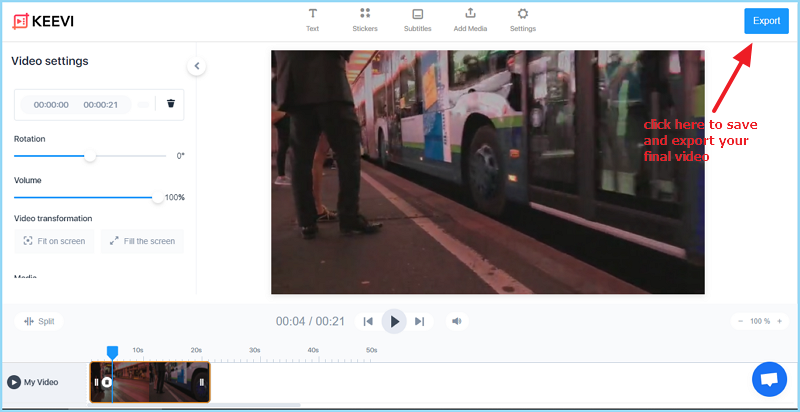
That is it! You now know how to clip a YouTube video with the Keevi YouTube Cutter. You can preview your new creation by clicking the play button in the editor’s main section.
Complete the process by clicking the ‘Export’ icon at the top right corner of the editor to render the new video.
Here is how to trim Youtube videos, i.e., shorten the video by cutting out the beginning and end. Simply adjust the sliders at each end of the clip.
Drag the sliders to the left or right of the clip as needed. Once you are satisfied with the length, hit ‘Export’ to render and share the video back on YouTube or other social channels.
No, you do not have to install Keevi YouTube Cutter. The app is entirely browser-based, i.e., you can access it from any web browser, including Google Chrome, Safari, Mozilla Firefox, and Microsoft Edge.
As a result, you can access it from all kinds of desktop and tablet devices, including MAC and Windows PCs. However, it is not accessible by mobile devices like Android phones and iPhones.
To access the Keevi YouTube Cutter on desktop and tablet devices, click on this link. It will take you straight to the editor’s homepage, where you can get started with cutting and trimming down YouTube videos.
Here are four tips to follow if you want to cut YouTube videos like a pro on Keevi YouTube Cutter.
1. Familiarise yourself with each frame
To get the best result when cutting a YouTube video, you should know precisely what and where you want to cut. Watch the YouTube video multiple times to familiarise yourself with every frame.
Asides from knowing what parts to cut, repeated exposure to the same content can trigger fresher ideas. It can help you create an even better-looking video than you originally planned.
Additionally, before you start cutting sections off the clip, use the video track magnifier to enlarge each frame. It will guarantee that you remove only the unnecessary parts and prevent mistakes.
2. Use the Preview for real-time corrections
No one is perfect. Professionals only appear to be because they double and triple-check their work before publishing them. Use the preview section in the Keevi YouTube Cutter to track each edit and see how it looks.
You can do this after every change or do it after applying all the edits. The most important thing is to check and ensure the video is perfect before hitting ‘Export.’
3. Maintain a project folder
One of the unique qualities of Keevi YouTube Cutter is the ability to merge a filmed video or image with a YouTube video. You can also record a voiceover as commentary on the YouTube video.
You need a place to keep track of these additional pieces of media. Not only will it make it easier to find them during editing, but it also guarantees their availability if you need future corrections.
4. Ensure visual and narrative cohesion
When cutting a YouTube video, try not to lose the narrative cohesion of the original video. If you are merging it with another video, make sure both videos are related, within the context of the overarching theme.
Additionally, maintain visual consistency. An unexplainable aspect ratio change or filter difference between clips will dilute the message of the final video.
Short videos are easily watched and likely to generate engagement and interactions from audiences across most social platforms.
Cutting out irrelevant sections instantly makes your YouTube video more meaningful and impactful.
Cutting videos into reaction clips help you create highlight reels that show off your skills and personality.
The rich text element allows you to create and format headings, paragraphs, blockquotes, images, and video all in one place instead of having to add and format them individually. Just double-click and easily create content.
A rich text element can be used with static or dynamic content. For static content, just drop it into any page and begin editing. For dynamic content, add a rich text field to any collection and then connect a rich text element to that field in the settings panel. Voila!
Headings, paragraphs, blockquotes, figures, images, and figure captions can all be styled after a class is added to the rich text element using the "When inside of" nested selector system.
The GIF Captioner is not the only tool Keevi has to offer. You can spice up your content by using Keevi to:
