
By 2022, online videos will make up more than 82% of all consumer internet traffic — 15 times higher than it was in 2017. (Cisco)
Viewers retain 95% of a message when they watch it in a video, compared to 10% when reading it in text. (Insivia)
In today’s world of digital marketing, a video marketing strategy is the only way forward. But not every video tells your story the way you want.
According to a research by Verizon media - 50% of the people watch videos with the sound off. How do they get your message then? Subtitles.
This shows the power of subtitles and the impact it can have on viewer experience.
Moreover, adding subtitles in your movies not only helps the audience better understand their content but is also essential for people who are either not a native speakers or speak a completely different language. Adding subtitles to your videos therefore increase accessibility, engagement and comprehension of the viewer.
This is why the importance of adding subtitles to your videos, including MP4 videos cannot be undermined. With Keevi you can add subtitles to your MP4 videos in just a few clicks.


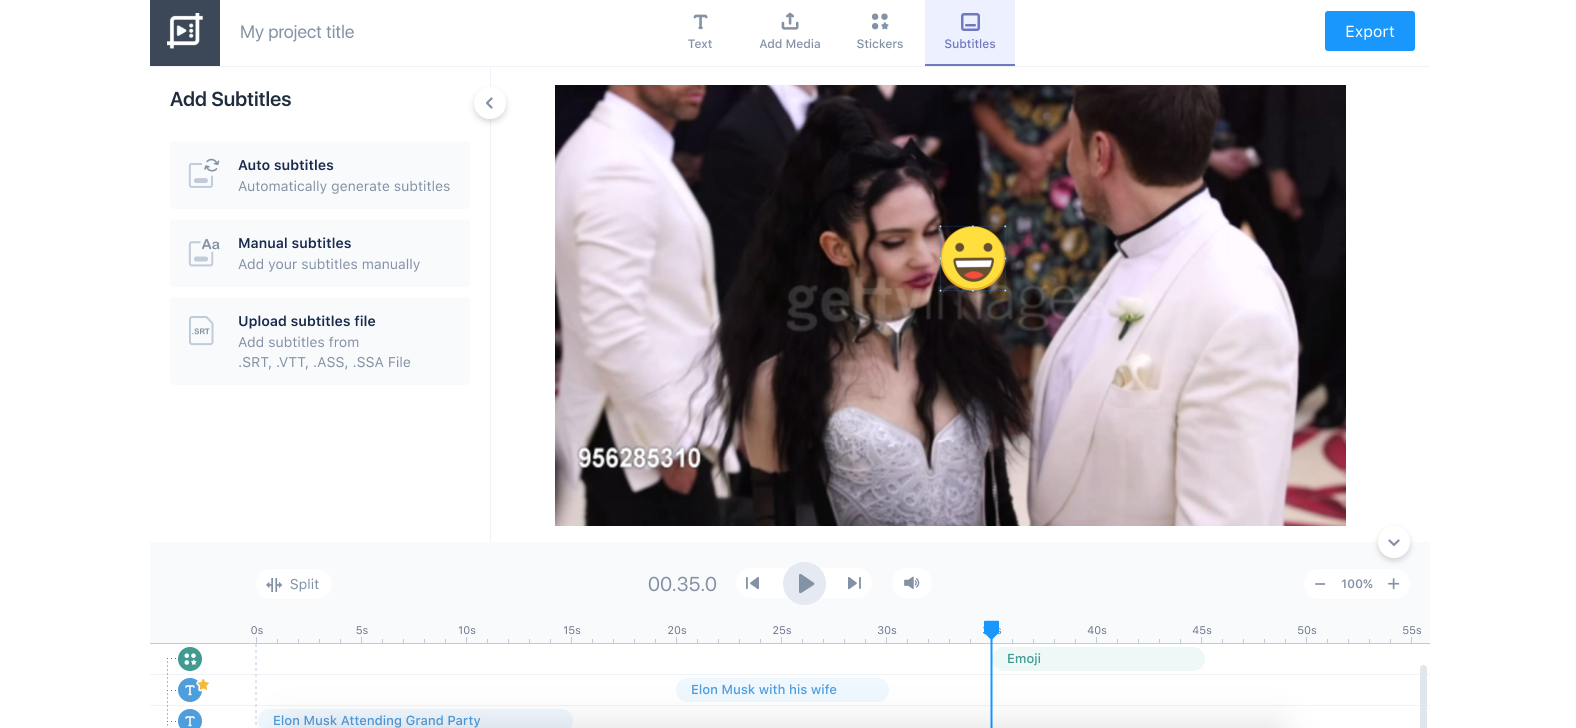
Upload, browse or paste the url of the video that you want to create permanent subtitles for. Uploading the video might take a few seconds. Once it’s uploaded it will take you to the keevi subtitle editor.
You can generate subtitles for your videos by any of the above mentioned ways. Just select one option and start creating your subtitles.


Now that you have your subtitles you can start editing them, if required. You can resync them with the video by changing the timestamps. You can also change the text, style, format and alignment of the subtitles.
Lastly you can download the subtitle file or video in different formats. Just go to Export, select Format and wait for the video to download.

Keevi works in your browser. You do not need to download or install it. Simply login, upload your video and start generating subtitles.
Keevi gives you the option to add multiple styles to your captions. You can change the font, color of the text, size, alignment, caption place; you can further add animations and stickers.
You can download your subtitles in VTT, Text and SRT formats. You can either download only the subtitles or you can download the subtitled video.
With Keevi, you can add permanent subtitles to your MP4 video. These subtitles cannot be turned off.
You can upload an SRT file and merge it with your MP4 video. Furthermore, you can upload subtitles in txt, vtt formats and can merge them easily with Keevi.
With Keevi you can create transcripts for your video in multiple formats and can download them as well.
No need to worry about creating your subtitles from scratch because Keevi will do it for you. Keevi’s AI-powered caption generator will create your subtitles in just a few minutes.
Keevi helps you translate subtitles in 119 languages, including English, Chinese, Russian, French, German, Spanish, Portugese, Korean, Japanese, Polish, Persian and more.
If you already have subtitles and you want to merge them with your video then you can do that with Keevi. You can upload your subtitles in different formats including vtt, text and srt.
Subtitles created by Keevi are automatically punctuated - commas, full stops/periods and exclamation marks etc.
Sync or resync your subtitles by adjusting timecodes of captions and subtitles. Just change the start and end time of the subtitles line and align them perfectly with your video.
Optimize your videos for social media by changing their aspect ratio.
Subtitles are a narration of what's being spoken in the video. It allows the viewer to better understand what’s happening in the video.
Did you know 85 percent of Facebook videos are watched without sound?
Majority of people that watch videos in a public setting watch them on mute. According to a research conducted by verizon media 1 out of 3 people turn on the captions when they are in a public place.
We need to understand that our audience is not confined to our native countries anymore. Your content reaches billions of people all over the world. It’s therefore not only important to target your home audience but also those who do not speak your language.
Google tends to crawl the metadata attached to your videos. It can’t crawl videos but it can crawl metadata. Hence it's better to have subtitles for your videos so that google knows what’s in the video and ranks you higher in the search results.

Facebook says that 41% of the videos are not comprehensible without sound and adding captions to them therefore provides context which makes them easier to understand.
Results of a Verizon media conducted study showed 37% of video viewers reported captioning made them turn the sound on because it made them more interested in the video.
The same study further revealed captioning helps advertisers as it leads to 8% lift in ad recall, 13% lift in brand linkage, and 10% lift in ad memory quality.
The rich text element allows you to create and format headings, paragraphs, blockquotes, images, and video all in one place instead of having to add and format them individually. Just double-click and easily create content.
A rich text element can be used with static or dynamic content. For static content, just drop it into any page and begin editing. For dynamic content, add a rich text field to any collection and then connect a rich text element to that field in the settings panel. Voila!
Headings, paragraphs, blockquotes, figures, images, and figure captions can all be styled after a class is added to the rich text element using the "When inside of" nested selector system.
The GIF Captioner is not the only tool Keevi has to offer. You can spice up your content by using Keevi to: