
Streaming may be the dominant form of consuming media for most people these days. However, VLC, a freeware company with a cross-platform presence, still retains a large user base. And that is not just because it is an excellent player that supports most multimedia files.
It is also a versatile tool with video editing capabilities, among which is cutting videos. It defeats the need to install and learn traditional editing tools by casual users who occasionally need to extract content from a video.
Sadly, since it is not VLC’s most apparent feature, not everyone knows how to use it.
This article will teach you how to cut videos in VLC on Windows and macOS devices. You will also learn how to use alternative apps if you need more than what VLC offers.
Can you Cut a Video in VLC?
The answer is clearly yes, but this is not breaking news when it comes to cutting a video in VLC. It is the way the multimedia performs this action that makes it special.
Unlike regular video editing programs with a cutting framework, VLC takes a different approach by using video recording.
Instead of dividing a clip into parts, VLC lets you record the section you want to extract from the video.
You can begin cutting a clip while simultaneously watching it. When you finish, you will have a smaller video, and the original video will remain intact, all for free.
How to Cut a Video in VLC Media Player in Windows 10
The good thing about cutting a video with VLC in Windows 10 is it is not different from doing the same if you are using Windows 7, 8 or 8.1, or older. VLC is a third-party application not affiliated with Microsoft, so its functionalities and processes remain the same, even if the OS evolves.
Now that you know that, let's get to it.
STEP 1 - Launch the program and Import the file
If you don’t have VLC installed on your computer, you can do that from here. Visit the page and click the Download button. The website will detect the operating system on your computer and download the correct file.
After download, complete the installation process and launch the program.
Once it is opened, go to Open File under Media in the menu bar.

Use the dialog box to locate the file you want to cut and load it into the program.
Alternatively, before launching the program, you can locate the video in your media folder, right-click and scroll to Open With. Then select VLC from the list of options, as shown below.

You can use this process to load any type of file into the media player because VLC supports a long list of file formats.
STEP 2 - Open the Cutting Tools
By default, the VLC toolbar consists only of the essential buttons you need to watch a video, such as the standard playback buttons. To access additional tools, you have to add them yourself.
Go to View at the menu bar and click Advanced Controls under the list of options.

As you can see from the picture below, there are now additional buttons in the toolbar. You can see the red recording button and a camera button to take a snapshot.

STEP 3 - Record the Clip
As mentioned earlier, cutting a video in VLC simply involves recording the part you want to extract. So, the next and most crucial step is recording the clip.
Drag the blue slider to the timestamp where the section you want begins.
Then press the red button and play the video simultaneously to start recording. Alternatively, you can just use the Shift + R button to start recording.

During this process, simply let the video play or repeatedly press the Frame by Frame button (first button from the right) for more accuracy.
When the slider reaches the end of the clip you want, press the recording button or Shift + R shortcut again.
VLC will automatically save the clip to a default location on your device.

Typically, this will be the Videos folder in your Windows computer. It will carry a filename like this ‘vlc-record-2021-07-23-12h27m50s.’
That’s it. You have successfully cut a video in VLC on your Windows computer.
How to Cut Video in VLC on MAC
Even though they are different operating systems, the process of cutting or trimming a video in VLC is the same as doing so on a Windows computer.
From launching the media player to importing the file and using the recording button, the general procedure remains the same. All you have to do is download and install the program.
Let’s focus on an issue you may likely encounter after completing your recording. That is, finding the saved video.
The solution here is to set the default save location before you start cutting your video with VLC.
Below is a quick step-by-step guide on how to change the default directory on VLC for recorded content.
- Launch the program and go to Preferences under the VLC Media Player menu option.

- Inside the Preferences window, select the Input/Codes tab. Then navigate to the Record Directory settings and click Browse.
A dialog box will open. Choose the folder where you want to save the recorded clips and hit Select Folder. Then click Save in the Preferences window to complete the change.

- Now head back to the main window and import the video you want to cut, then follow the process as outlined in the Windows 10 section above.
NOTE: the shortcuts are different in macOS. Instead of Shift + R, use Option + Command + R (⌥⌘R) to start and stop recording. Alternatively, you could go to the Playback menu option and click Record.

When you finish recording, VLC will save the cut video in the folder you set earlier.
How to cut a video song in VLC media player
The process of cutting a song in a VLC media player is the same as cutting a video.
VLC supports audio file formats like MP3, FLAC, WAV, DV Audio, and more.
All you have to do is import the file(s) into the player and use the recording button to capture the parts you need.

When you finish recording, the audio clip will be saved in the specified folder, in the same file format as the original file. So you will be able to play it on any regular music player of your choice.
An Alternative Way to Cut a Video Clip from a Movie in VLC with Windows Video Editor

For all the advantages of cutting a video with VLC, the simple fact that it is not a video editing tool limits your editing options. For instance, you can’t cut and merge multiple sections from one video or add sound effects.
To do any of this, you need an alternative.
Windows Video Editor, a simple video editing software that comes with computers running Windows 10. It also supports different video file formats and editing actions like splitting and cropping, etc.
Windows Video Editor also has a shallow learning curve.
Simply follow these steps:
STEP 1 - Import the Video
If you have never used the program, you can find it by searching using the keyword “Video Editor'' in the Windows Start Menu.

Click the New Video Project option when the app opens and enter the title in the small pop-up window.

With a new project fully opened, the next thing is importing the video you want to cut into the editor.
Following the process in the video below, open the Project Library. Then click the Add button to access the video from its folder. If you want to cut more than one video, select each one, and the editor will import all of them at once.

Having imported the video into the Project Library, mark the video(s) and click the “Place in Storyboard” button. Alternatively, you can select each video and drag them below.
STEP 2 - Cut the Video
Now that the video is on the Storyboard, cutting can begin. You should notice that the action buttons in the Storyboard panel are now activated, including the Split button.

Select the video you want to cut and click Split.
Clicking Split will open the editing actions’ controls. You will see a playback window with a cursor and a side panel titled Clip One and Clip Two.
Drag the cursor to the beginning of the part you want to cut. Use the timestamp beside each clip in the side panel to ensure accuracy. Alternatively, replay the video with the playback button and pause at the right moment.
Click Done to cut the video into two.

Back in the main editor window, you will see the video has been cut into two separate windows.
Select the first clip and repeat the cutting process to isolate the part you need in full. This should leave you with three videos in the Storyboard. Select the remaining two and delete them from the board using the trash button.
Now that you have successfully extracted the clip you want from the original video, you can apply any personalization effect you want. You can do all the things you can’t do on VLC, such as adding —
- Motion effects
- Contextual text
- Filters
- Custom audio and background music
You can also modify the playback speed. When you finish, replay the video using the playback panel to track your edits.
STEP 3 - Export the Video
Finally, once you are satisfied with the result, click Finish Video at the top right corner of the editor to save your work.

When you do, a pop-up window will ask you to set the output quality of the video. Choose the highest possible quality.
Once you select where you want to save the video, the rendering will begin, and that’s it. The editor will save the video in the designated folder.
Another Way to Cut and Crop Video in VLC using iMovie
It isn’t just Windows 10 users that have a free in-built alternative to VLC for cutting videos. Mac users also have a good video editing tool, iMovie, with even more personalization features than Windows Video Editor.
iMovie comes with video effects and transitions, themes, video stabilization, an extensive audio library, and green screen support.
Besides that, it stays true to the Apple design by having a gorgeous yet intuitive interface. There is no need to be a video editing expert to cut videos with this software.
It is available to iPad and iPhone users, so you can cut movies on the go.
Here is a quick breakdown of how to use iMovie as an alternative to VLC to cut videos.
STEP 1 - Start a New Project and Import the Video
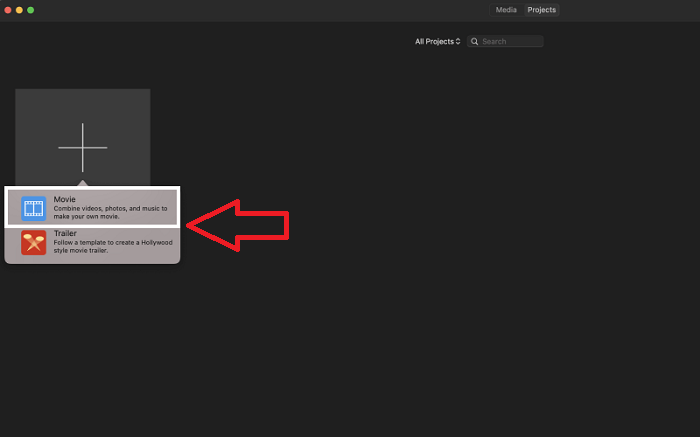
After launching iMovie on your device, click the Projects tab and click on Create New.
You will get a small pop-up window with the options to choose the type of project you want to create. Select Movie.
When you do, the iMovie editor will open, looking like the image below. You can replay the video(s) you are working on in the Preview Monitor, access imported files in the Media panel, and track each edit in the Timeline.

To import the video you want to cut, click the Import button at the top of the editor. It will open your storage folders, from which you can track and select the relevant video. You can choose multiple videos to import at once too.

When you have selected the video(s) you want to cut, click Import Selected.
STEP 2 - Cut the Video
After uploading the video(s) to the editor, it will appear in the Media. Drag it and place it in the Timeline section to start cutting.
Once it is there, drag the playhead to the starting point of the part in the video you want to extract. Then right-click and select Split Clip from the list of options. You can also use Command + B instead.

Next, move the playhead to the endpoint of the needed section, and perform the same action.
With that, the editor will separate the video into three different parts. Finally, proceed to delete the parts you don’t need, leaving only the relevant clip.
STEP 3 - Export the Video
Before exporting the video, you can take advantage of the iMovie’s features and personalize the clip. Here, you can add contextual texts or sound effects to put your stamp on the original content.
Don’t forget to use the preview monitor to replay your video and ensure everything is in order. When you are satisfied, click the button at the top right corner of the editor to export the video.

You can share the video directly via Email, YouTube, or Facebook. To save it to your device, click File. Then select the format, resolution, and quality of the clip.
Follow the prompts to complete the export.
NOTE: Choose the highest possible quality and resolution to retain the clarity of your edit.

You can also share the video online from within iMovie after saving it to your device. To do this, return to the main Projects screen.

Then click the More button (three-dots icon) as seen above to select your preferred option.
With that, you have successfully cut a video with iMovie.
Conclusion
When you find an interesting moment while watching a video with VLC, there is an urge to extract and share it with friends or online. Thankfully, VLC has an in-built feature that allows you to ‘cut’ a video by recording the parts you need.
This blog has detailed a step-by-step guide on how you can do this for video and music files on Windows and Mac devices. It is easy and requires little background knowledge on your part.
We also covered user-friendly alternatives if you want something with a lot more customization features.
For more tips and tutorials on using tools like this to create video content, visit our webpage.
.jpg)

