Creating video content, either as a professional, online content creator, or hobbyist, often means working with multiple clips, freshly filmed or from published online works.
To create a meaningful narrative out of them, one must combine them. After merging the clips into a singular finished product, one can then share it on any social platform.
You’d need an app to put together two or more video clips. Thankfully, a limitless number of video editing tools are available, which makes your life easier but only if you select the right app.
In this blog, we will introduce four such apps to you, tell you about their distinguishing features, how they work, and in the end help you select the right one.
Ready? Let’s get into it.
Four Apps to Put Videos Together
These days, video content is readily accessible across PC and mobile devices. So it makes sense that the tools for creating them are available on these devices too.
For PC users, unless you are an expert video editor looking for something with advanced features, there is hardly any reason to install video editing software. In this regard, Keevi Video Editor is a great web-based tool for combining videos.
Adobe Spark is another notable option. It also has a web-based version, as well as iOS, macOS, and Android versions.
Also, instead of downloading an app, Windows 10 users can use the native editor, Windows Video Editor, to edit and combine multiple videos.
Lastly, Android users looking for something exclusively designed for the platform with robust editing features will find that InShot is a reliable tool.
In this How-To guide, we will cover how to use these four apps -
- Keevi Video Editor (Online)
- InShot (mobile devices)
- Adobe Spark (online)
- Video Editor (Windows 10)
How to Merge Videos Online with Keevi

Beyond the obvious benefit of not having to install another software on your device, Keevi Video Editor is an excellent tool to combine videos that are already on the internet.
It has a URL import feature that allows the import of YouTube videos simply by pasting their link in an address bar. Keevi grabs the link and automatically downloads them into the editor, saving you time and effort on downloading the videos with another third-party tool.
As for customization after merging, Keevi Video Editor comes with a wide range of features. Some of them include -
- Contextual static and animated text
- GIFs and Stickers
- Auto Subtitles
- Voice recording, etc
Most importantly, it is extremely easy to use, with an intuitive interface that makes it easy for beginners and professionals to use.
Here is a practical guide on how to use the editor to combine videos.
STEP 1 - Import the Videos
Follow this link to open the editor. Your screen should look like the picture below.
If the first video you want to merge with others is online, paste the link in the address bar below, and the editor will import it from there.

However, if the video is on your PC or laptop, drag it onto the ‘Drop your video here’ box or click Browse to manually import it via a dialog box.
Keevi also has a large database of stock videos. You can access them via the Stock Videos tab in the Add Video interface.

Once the first video is in, select the Add Media tab at the top of the editor.

There is a list with three options to add video, image, or audio to the clip in the editor.
Select Add Video to import another footage, following the same process as the first video.
You can return to this tab to add voiceover recordings or merge the video with images.
After adding the second video, the timeline should look like this -

Remember, the number of tracks is dependent on the number of videos you add, and you can add as many videos as you need.
STEP 2 - Edit the Videos
When all the videos are in the editor, you can now shape them into your preferred look.
One of the most frequent and relevant editing actions to perform at this stage is splitting and trimming the clips to remove unnecessary sections.
To split a clip, simply select it and place the blue playhead at the timestamp you want to cut from the rest of the clip.
Next, click the Split button at the top of the timeline. You can watch the process in the GIF below.
To delete separated clips you no longer need, click the trash icon after selecting the clip.

To trim, select the clip, then drag the handlebars at the beginning and end to the left or right as necessary.
Also, as you can see, you can set the order of appearance of each clip. You simply have to drag it to the time you want it to appear.
Combining this action with splitting allows you to mesh multiple clips together to create a linear narrative without necessarily filming it that way.
Other useful editing actions include setting the video’s aspect ratio—a useful tool to deploy if the clips have different dimensions.
Simply head to the Settings tab and click the dropdown button under Select Format. You will see a list of aspect ratios for different social media platforms, including YouTube, Twitter, Facebook, and Instagram.
Not publishing to either of those platforms? It doesn’t matter. Choose the one that best fits how you want the video to appear to your audience.

For other customizations such as Text and Subtitles, simply head to the relevant tab and apply the options as needed.
Also, use the playback buttons to preview your edits regularly.
STEP 3 - Export the Video
When you are satisfied with the final look of the videos, click Export at the top-right corner of the editor interface to start rendering.

When it is complete, you will have a fully merged video.
You can either save the result to your device or share it on any social media platform. Keevi Video Editor can currently share to more than thirty of them.
How to Combine Two Videos with Adobe Spark

Adobe Spark is specifically designed for social media content creators. You can use it to make graphics, collages, animations, and merge videos from your device or its large pool of stock files.
Spark has three sub-apps, Spark Post, Spark Page, and Spark Video. All three apps are available via web browsers and iOS devices. However, Spark Post is the only available app for Android devices.
To combine videos with Adobe Spark, sign on to spark.adobe.com and follow these steps.
STEP 1 - Launch the Editor
After signing up, the start screen should look like below. There is a list of the type of content you can create with the app.

Since you are merging videos, select Slideshow. There will be a prompt to enter the title of the video you want to create. Feel free to skip it or enter the title.
Next, the app will present a list of video templates. Select ‘Start from Scratch’ to enter the editor.

STEP 2 - Import the Videos
Once you are in the editor, click Video to import the first video file via a dialog box.
If the video you want to merge is online and you haven’t downloaded it, use any third-party tool of your choice to do so. For example, if it is a YouTube video, you can download it with YT1s.

After selecting the video, choose how much of the video you want to import by dragging the slider as appropriate.

Then click Save when you finish to return to the editor.
To import subsequent videos, click the + slide beside the large play button at the bottom of the editor. Then repeat the same process to import each video.

You don’t have to import the videos in the order of appearance. Instead, you can rearrange the videos by dragging the slides into new positions.
STEP 3 - Export the Video
Use any of the options highlighted below to customize the video further. Some of the things you can do include changing the layout, setting the theme, aspect ratio, and adding background music.
You can also use the microphone button to add a voice recording to the video.
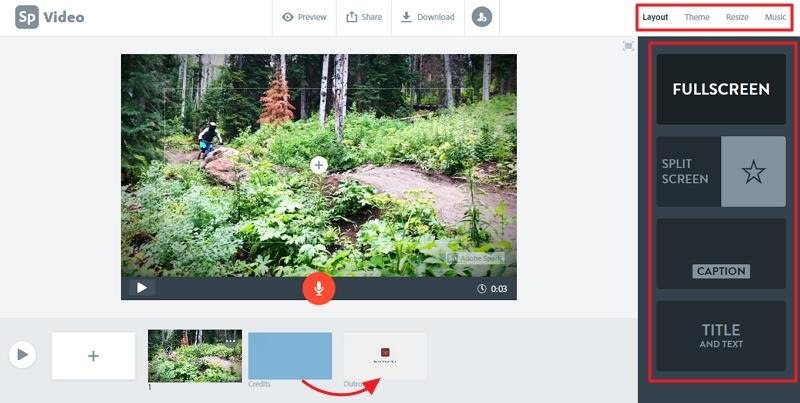
When you finish, click Download at the top of the editor to save the merged video to your computer. Alternatively, click Share to publish it on social media or invite someone else to work on the video.
How to Splice Videos Together on Windows 10 with Video Editor

PC users, specifically those with Windows 10, can combine videos together using the native video editor.
Windows Video Editor is an upgrade of the famous Windows Movie Maker that came with older Windows software. It supports splitting, trimming, and a host of personalization actions like filters and 3D effects.
Unfortunately, it does not have automatic video import, so you must first download online files to merge them.
Other than that and its basic features, it is a useful video editing app for splicing videos together. Here is how to use it.
STEP 1 - Open the App
If you haven’t used the app before, you can access it by searching ‘Video Editor’ in the start menu.

Select it or click Open in the details panel to launch the app.
STEP 2 - Import the Videos
The next major step is importing the video into the editor.
Click the New Video Project button on the start screen and enter the title of the project.
While you can always skip the naming, it is advisable not to do so to keep your work organized.
Once you’ve created a new project, click the right-facing arrow beside the preview window to add your videos into the editor, as shown below.

A significant advantage of using this editor is that you can add several videos to the editor at once.
Once they are in the library, drag them down to the Storyboard panel below or click Place in Storyboard.
If you happen to select multiple videos and they aren’t in your preferred order of appearance, simply drag the video thumbnail and rearrange them to your liking.
TIP - use the playback buttons in the video panel to review your work. It will save you time from correcting mistakes.
STEP 3 - Export the Video
If all you want to do is merge the videos without additional edits, click Finish Video at the top of the editor.
For additional edits, such as splitting, trimming, or filters, simply select the action of your choice on the editor’s interface.

When you do, a small dialog box will open to select the video’s output quality.
It is advisable to choose the highest possible option for the best result.
When you do, click Export and select where you want to save the rendered video.
How to Merge Videos Together on Mobile Devices with InShOt

For mobile users across iOS and Android, there is no shortage of video editing apps, available on official and unofficial play stores. However, very few of them have the top of the line features of InShOt.
It supports the merging of videos with high-definition and exports accordingly. The app also comes with basic editing tools for splitting, trimming, cutting, and resizing. There is also support for cropping.
When it comes to video personalization, you can also use InShOt to -
- Add transition effects
- Add background music
- Add contextual text
- Make video and picture collages
Lastly, it is quite easy to use, but it does come with ads unless you pay for the premium version.
Here is how to use this popular app to put multiple videos together.
STEP 1 - Launch the App and Import the Videos
If you don’t have the app from your phone, download it from here for Android and iOS devices.
When the installation is complete, launch the app and click Video.

Selecting Video will open a folder of the most recent files on your phone. If the videos you want to merge are here, simply select them and tap the arrow button.

Otherwise, click the dropdown arrow at the foot of the screen to open the relevant folder. Then select the videos you want to merge.
TIP - Long press on a clip, then drag to move its position to change the order of appearance after importing.
STEP 2 - Edit as Necessary
Like we mentioned for the other tools, you should edit the videos to create a more unified narrative. However, if you’ve done that already or don’t need to, move on to the next step.
Splitting and trimming are two of the most important edits for cohesive storytelling during video merging. To do this with InShOt, tap the video to reveal the handlebars.

Next, slide them to the left or right to trim the video.
To split a video, select the function from the action panel directly above the video timeline.

You can also access additional editing and personalization features in this panel.
Remember to use the Play button to preview your edits.
STEP 3 - Export the Video
When you finish editing the clip to your satisfaction, tap the Save button at the top-right corner of the screen.

You will see a small dialog box to set the video resolution and frame rate.
While it is advisable to choose the highest possible quality, InShOt supports 4K resolution, which might be overkill for a mobile video. You can select 720p or 1080p resolution for a better balance between file size and quality.
Click Save again, and the app will start rendering the video.
When it is complete, InShOt will automatically save the video to a similarly named folder on your mobile device. You can then share it with others via messaging apps, social media, or email.
Useful Tips to Stitch Videos Together

Combining videos is simple enough for anyone to grasp, and the process is relatively uniform across different tools and devices.
Nevertheless, to create something capable of capturing an audience, these are a few tips used by professionals and hobbyists alike,
- Merge videos with similar aspect ratios

Most video editing apps support the merging of videos with different aspect ratios i.e, width and height. While this expands creative possibilities, it is advisable to stick to videos with similar aspect ratios.
Here is why.
One, trying to cram videos with widely different dimensions into one dimension means reducing the quality of the individual videos.
You will have to enlarge videos with smaller ratios or compress them if they are of higher ratios to equal the central aspect ratio. This negatively impacts the overall quality of the video.
Secondly, it is hard to maintain narrative cohesion with widely different aspect ratios. Going from a landscape format to a portrait format can distract and diminish your audience’s viewing experience.
- Use transition effects to maintain flow

To successfully bridge scenes without losing coherence, use transition effects. It is a subtle and gentle way to move your viewers through different parts of the narrative.
If you use an editor without transition effects, you can always download some and merge them with the video.
However, transition effects are fun, and it is easy to overuse them quickly. Remember to keep things in moderation and only use where necessary.
- Use contextual texts

Using different styles to pass information to your viewers keeps them engaged and excited about the video.
Contextual text is a useful customization effect for this. When used creatively, it spices up a video and draws the attention of the audience.
When you apply them, though, don’t make them too large or too small. Also, keep the texts as succinct as possible. They should aid the visual experience, not dominate or distract from it.
- Get a good balance between file size and output quality

When you combine multiple videos, the resultant video will have a larger file size than each one. To keep file size small, many users compromise on output quality. This is because file size has a directly proportional relationship with output quality.
However, this is not necessarily a good idea because a high output video quality is always better. Instead, consider the purpose of the video and the intended publishing platform. It is more advisable to split the video into parts or merge fewer individual videos.
How To Combine Videos for YouTube?
Until 2017, YouTube had an editor that allowed creators to combine different videos into one. It also had a host of additional features that made it a more robust editor. However, it is no longer possible to combine videos with the YouTube Editor.
To combine videos for YouTube, you can use any of the tools discussed above. Keevi Video Editor is particularly useful because you can import YouTube videos directly to merge without first downloading them.
Can I Combine Videos and Pictures?
Yes, you can. It is possible to merge videos and pictures into one media file and create something fun and unique, either for online content or as a slideshow from a personal trip or event.
Most tools that support video merging are equally capable of combining videos and pictures with a similar editing process. Here are eight of them for different platforms and devices.
What is the Best App to Combine Videos into One?
There are plenty of good to great video editing apps for combining videos into one. However, we recommend Keevi Video Editor. It is completely web-based, supports videos in multiple formats, and has URL import, so users never have to download a video to merge it with others.
Wrapping it Up
Whether you need to for personal or professional reasons, combining videos is an almost inevitable process of video creation. It helps in creating cohesive, enjoyable stories and streamlining storage space.
For first-timers, this can seem daunting, but it doesn’t need to be.
In this blog, we have discussed four great apps to combine videos and how to use them. Simply following the guide will enable you to create fun videos of your own in no time.
.jpg)

