
YouTube is as big as video content creation gets. But to make the most of it, you need to ensure that your content can be watched and enjoyed by as many viewers as possible.
In this age, a foreign language, hearing difficulties or impairment, missing headphones, etc. should not make your video content less accessible.
Therefore, incorporating captions and subtitles into YouTube videos can make a world of difference to audiences. Luckily, there are various ways you can go about doing this.
This post is going to show you how to add subtitles to YouTube videos, the importance of putting captions in a video, how to download subtitles from YouTube, as well as captioning tools you can use to get the job done.
Why Is It Important To Include Subtitles In Your YouTube Videos
You might be wondering what all the fuss over captioning videos is about, so let's talk about why you should embrace this practice and what you stand to gain from adding subtitles to videos you share on your YouTube channel.
1. Increase understanding and watch time
Having text on the screen can go a long way in helping people grasp what the video is trying to communicate. Many may find it hard to follow the message in a video by simply watching and listening to it. And it's not always convenient to listen to a video with the sound on.
According to Facebook, adding captions to videos can increase watch time by 12%. Another study revealed that subtitled videos get over 7% more views on average, and 80% more people watch videos to the end when subtitles are included.
2. Expand your audience base
More than 5% of the people in the world require some kind of therapy or help to address their “disabling” hearing loss. Add to that figure the number of people who are not native speakers of your language and people who prefer watching videos on mute, and you'll be losing out on a huge potential audience.
Captions open the doors for more people to find, consume, and share your content.
3. Enhance the user experience
A lot of people don't want to or can't watch your video with sound, so making sure that your content doesn't require sound to share a message can improve your channel experience. People can consume your content the way they like on the go rather than saving it to watch later and never coming back to it.
4. Take your SEO to the next level
When you add subtitles to a video on your channel, YouTube and Google would index the text. This will help them understand the content of your video better, boost your SEO rankings, strengthen your keyword targeting, and make it easier for people to find, watch, and engage with your videos.
How to Add Subtitles on YouTube
There are three ways you can add subtitles/captions on YouTube for videos that you own.
1. Use the automatic captioning feature
YouTube uses speech recognition technology to automatically generate captions for videos uploaded to the platform. However, these captions are rarely accurate and they don’t often include correct punctuation, so you’ll have to do some or a lot of editing to fix problem areas so that the text makes sense.
Here’s how to put captions on a video using this method:
- Head over to your browser and log in to YouTube Studio.
- Click on Subtitles on the left side of your dashboard.

- Choose the video you want to add captions to.

- Click on Set Language, scroll through the options to select the default language for your video caption.

- You’ll be taken to a page showing a list of subtitled videos, click ADD and wait for your automatic captions to be generated.

You can follow this process to add additional subtitles in other languages to your video.
2. Create your own captions from scratch
If you’ve got time on your hands, the DIY method is another route for adding subtitles to videos on YouTube. You can choose to paste a transcript of your subtitles or captions into YouTube, or type them out manually using these steps:
- Go to YouTube Studio and select Subtitles from the Studio dashboard menu on the left.
- Click on the video you want to add subtitles to, choose a language, and click ADD.
- Select Type Manually from the options menu.

- Start playing the video and enter your captions and subtitles to match the audio. Remember to add text like [knock] or [applause] so viewers know what’s happening in the video.
- Hit Publish when you’re done.
Consider using these keyboard shortcuts to save time while adding closed captioning to video:
3. Use a captioning service
The third and recommended option is to outsource your captioning and subtitling needs to a third-party source that specializes in creating accurate, high-quality captions, translations, and transcripts for your videos.
There are lots of options for both free and paid tools for you to choose from. For this method, you’ll need to upload a caption file in SRT, TTML, WebVTT, or other supported formats to your YouTube video.
Although the steps for adding a caption file are subject to frequent changes, here’s how it generally goes:
- Sign in to YouTube and select YouTube Studio from the drop down menu.
- Select Subtitles from the menu on the left side of the screen, choose the video you want to add the caption file to, and the language for the caption.
- Click ADD and select Upload file.

- Select With timing or Without timing and click Continue.

- Choose the file you want to upload, then click Save.
How to Download YouTube Captions
If you want to download subtitles from YouTube to edit them in a different program or save them for future use, you can do so in these steps:
- Go to YouTube Studio.
- Select Subtitles from the left menu.
- Click the video with the captions you want to download.
- From the Subtitles column, click EDIT next to the language you want to download.
- Click the┇and select Download Subtitles.
- A file containing the captions track will be downloaded on your browser.
Adding Captions To Videos With Keevi
Much to the dismay of users and creators, YouTube has discontinued its community caption feature which allowed anyone to add captions and subtitles to other people’s videos.
This decision has made it harder for creators to cater to different audiences by incorporating captions and foreign language subs into their videos. As a result, third-party captioning tools like Keevi have become even more important.
If you’re searching for a faster, easier, more accurate way to subtitle a video, our free online video editor, Keevi, is one of the best tools you can use. Here’s a quick step-by-step guide on how to caption YouTube videos with Keevi.
- Head to Keevi.io on your tablet, Windows, or Mac device and click Get Started to launch the video editor.

- Browse through your library and select the video you want to add captions to, or drag and drop it into the box, or paste a link to the video to extract it from YouTube.

- Once your video is uploaded successfully to the Keevi video studio, click on Subtitles, then scroll to the left sidebar and select one of the options. You can manually add your own subtitles, upload a caption file, or let Keevi generate accurate subtitles for you.

- Click Export to save, download, or share the captioned video.
Other Captioning Tools For Adding Subtitles To Videos
There are a variety of tools that can help you create subtitles for YouTube videos and each one has its merits and shortcomings. It’s up to you to make sure you choose one that suits your particular needs, preferences, and budget.
Amara
Amara is an open-source, DIY captioning tool you can use to add subtitles to videos. All you have to do is create an account, copy and paste the URL of the video you want to subtitle, then follow the steps to type, sync, and review your captions.
Once you're done typing out your caption, you can publish it to integrate it with your video so your video can be viewed on the Amara website. Alternatively, you can download the generated caption file and upload it to your YouTube video.
Checksub
Checksub is an automatic subtitle generator that helps you create captions and subtitles for a video. You have to register on the platform to be able to edit videos with Checksub.
Once you're signed in, you can upload your content, select the original language of your video, choose the language you want your caption or subtitle to be generated in, and wait for the results. You can then optimize the generated captions/subtitles, insert them into your video, and export the final outcome.
Checksub allows you to test the captioning feature for free for 7 days. After that, you're going to need to purchase credits or get a subscription.
Adobe Spark
Another tool you can use to put captions on a video and make your content more accessible is Adobe Spark. Although it doesn’t generate subtitles for you or allow you to upload caption files, you can add your subtitle text manually and adjust the time stamps to match your audio perfectly. When you’re done adding and editing your captions, you can instantly download the final video and share it online.
You can try Adobe Spark for free for 30 days, after which you’ll need to pay $9.99/month to keep using the service.
How to Add Subtitles to a YouTube Video That’s Not Yours
Maybe you’re writing a blog post or teaching a course about something and there’s a YouTube video you would like to use to elaborate on the topic, but the video doesn’t have captions. Or maybe you saw a video on another person’s channel that resonated with you that you think other people might find relevant if there were subtitles for the video in their language.
How do you go about adding captions and subtitles to other people’s videos without infringing on copyright laws? Is it even possible?
Since YouTube’s community caption feature has come to an end, there are two ways you can legally add subtitles to YouTube videos you don’t own.
1. Prepare a subtitle file and share it with the owner of the video
A YouTube creator who is serious about expanding their reach and increasing engagement is not going to say no to volunteered subtitles or captions. So you can create a time-coded caption/subtitle file, reach out to the owner, and share it with them so they can add it to their video.
2. Use 3PlayMedia’s 3Play Plugin
This Plugin is a free tool that lets you add audio descriptions, captions, and transcripts to third-party videos to create an accessible and interactive video experience. Here’s how it works:
- Create a 3PlayMedia account, upload the video you want captioned by pasting the direct link to the YouTube video.
- Order captioning and transcription.
- Once your captions are ready, select your video and click on Publish > Publish Plugin from the dropdown menu.
- Choose Closed Captions and other features you want on your video.
- Copy and paste the iframe embed code into the HTML of your website page to display the original video with closed captions overlaid on it.
This way the video’s author gets all the views they deserve and you get to add closed captions to the video without republishing it on your channel or infringing on their copyright.
How To Turn On Subtitles On YouTube In a Web Browser
If closed captions are available for a video on YouTube, you can easily turn it on to enhance your viewing experience by following these steps:
- Go to YouTube and find the video you want to watch.
- If captions are available, you’ll notice a Subtitles/CC icon at the bottom right of the video.
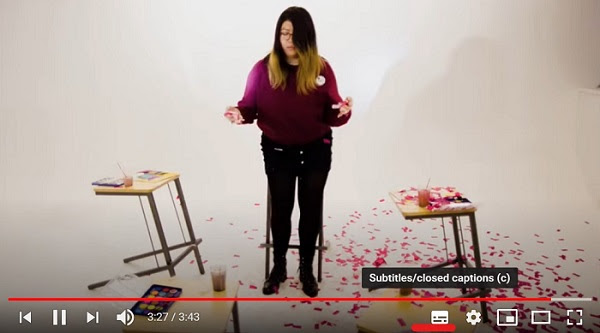
- Click the Subtitles/CC icon to turn on the captions. A red line will appear beneath the icon, once captions are enabled.

To adjust the size, style, color, opacity, and font of your captions:
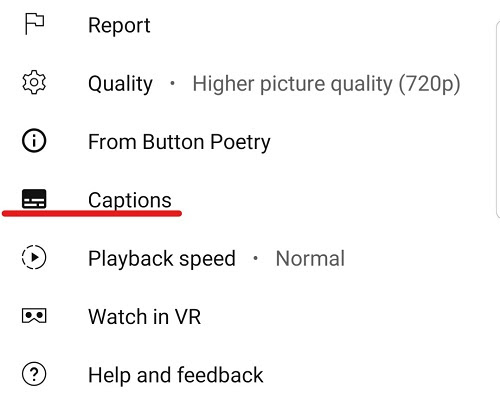
- Click the ⛭ icon at the bottom to open the settings.

- Click Subtitles/CC, followed by Options.

- Customize the settings however you like.

To choose a different caption language:
- Click on the ⛭ icon.
- Select Subtitles/CC.
- Choose a language.
- If the language you’re looking for isn’t listed, click Auto-Translate and select a language.

How to Turn On YouTube Subtitles On Mobile App
You can enable or disable YouTube video captions on your Android or iPhone in a few easy steps. Here’s how to do it:
- Tap the ┇ icon in the upper right corner of the video you want to watch.

- Select Captions from the menu that pops up.
- Choose the captioning option or language you prefer or tap Turn off Captions to disable the default captions.

How to Activate Default Captions Setting For All Videos
To turn on subtitles for all YouTube videos you watch via your web browser, follow these steps:
- Click on your account icon to reveal the account menu.
- Select Settings from the menu.

- Click Playback and performance, then check the Always show captions options to turn the default settings on.

- Check the Include auto-generated captions (when available) option. Your changes will be automatically saved.
How to Deactivate YouTube Subtitles
If you want to turn off the default YouTube captions, just follow these steps:
- Tap your profile picture.
- Scroll down the menu and select Settings.
- Scroll to the menu on the left and click Playback and performance.
- Uncheck the Always show captions and Include auto-generated captions (when available) options.
To turn off the captions on a specific video:
- Click the Captions icon.
- If there’s a red line under the Captions icon, it means subtitles are enabled. When you click the icon, the line will disappear.
- Alternatively, you can click the ⛭ icon and select Subtitles/CC from the options.
- Check Off to disable the captions for the video.

Editing and Removing Captions On YouTube
You can edit the text and timing of your video captions within the YouTube platform. Here’s how:
- Log in to YouTube Studio.
- Select Subtitles from the left menu bar.
- Click the video with the captions you want to edit.
- Choose a language for the captions and select Edit.
a. To remove captions for a language tap the ┇ icon and select Delete from the options.
b. Confirm the action by clicking DELETE CAPTIONS.
- For automatic captions, click DUPLICATE AND EDIT, followed by CONTINUE.
- To edit the text, click inside any line in the captions track panel.
- To edit caption time stamps, select a line in the caption track panel and:
a. Press the right or left arrow on your keyboard to adjust duration.
b. Press the up or down arrow on your keyboard to change timing.
- Click Publish to save the changes when you’re done.
Improve the Quality of Your YouTube Video Content
Making your videos accessible and improving user experience should be at the core of your YouTube content creation strategy. There are billions of videos on the platform, so you need all the help you can get if you’re going to stand out on YouTube.
As you can see, there are lots of ways to get subtitles for your videos, and many of them are pretty simple and don’t require you to expend too much energy, time, or money. You know what your options are, so start taking advantage of them.
Edit, add subtitles, and generate captions for your videos within minutes for free with Keevi. Take the tool for a spin today!
.jpg)

